From the File menu, choose Export or click on the Export button ![]() in the main toolbar.
in the main toolbar.
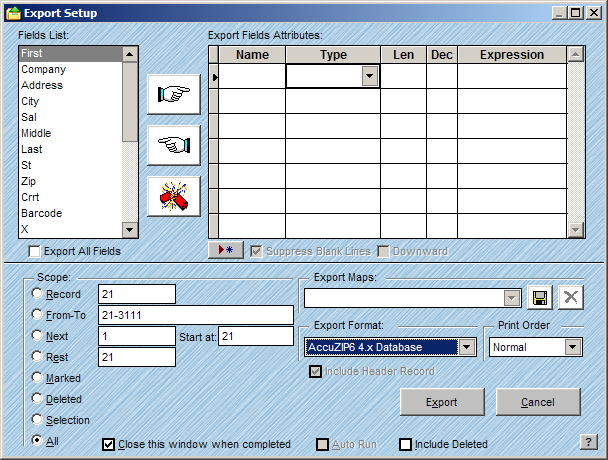
The Export feature allows you to save the data in your list to disk in many different file formats. The Export Setup window supports the scope radio buttons so you can export specific sets of data. This feature also supports expression building, which will allow you to combine fields or separate the components of a field. Field widths can be adjusted, and the type of the field can be modified as well.
Follow the steps below to Export data from an AccuZIP6 Database.
From the File menu, choose Export or click on the Export button ![]() in the main toolbar.
in the main toolbar.
The Export Setup window will appear.

Select the fields that you want to export by double-clicking in the Field List or click on the field and use the pointing finger buttons to move each field, or, click the Export All Fields check box if desired.
Adjust the field Type and Length as desired.
If you would like to combine fields or separate field components, click into the Expression box and type the desired expression.
You can use Expressions to combine two fields or to rename the fields as you’re exporting. For example, to combine FIRST and LAST name with a space between them and to change the field name to NAME, you would use the Expression:
ALLT(first)+" "+ALLT(last)
For assistance on writing Expressions, contact AccuZIP6 Technical Support. See Technical Support Options for more information.
Click on the desired radio button that will best determine your scope for exporting records.
For information on scope radio buttons, see Consistent Window Formats.
Choose the desired file format from the Export Format pop-up.
Click the Include Header Record check box if desired.
The Include Header Record check box will not be available for file types that already contain a header record by default.
Click Export.
Saving the Export Map:
Once you have set up an Export Map, you can save the mapping to use again when you want to export data with the same output fields by following the steps below:
Click the Disk button ![]() .
.
In the Save As dialog box, the file name will appear under Save Map As. The file name will have a .emp extension. By default, the map will save using the file name that you are exporting. However, if you would like to use a different name for your map, highlight the file name and change it.
Do not browse to a new location - the Field Maps folder will be selected automatically.
Click Save.
Notice that your Export Map has been saved so that you can select it in the future from the Export Map pull-down menu.
To delete the Export Map, click the Delete button ![]() .
.