Presorting the mail with AccuZIP6 will allow you to take advantage of the lowest postage rates for the type of mail you’ve selected. AccuZIP6’s Presort Setup window will assist you in defining your mailing specifications with easy-to-use calculators for determining the size, weight and container minimum and maximums. The window also performs real-time lookup of your local post office, DSCF, and DBMC. AccuZIP6 creates a presort folder in the directory of your choice, which will hold all of the presort information, including tags, reports, and all of the records that were presorted. To save you time, presort settings can be saved so that you do not have to enter the settings for each type of job that you do.
Follow the steps below to Presort the mail:
From the Sort menu, choose Presort Mail, or click on the Presort Mail button from the main toolbar.
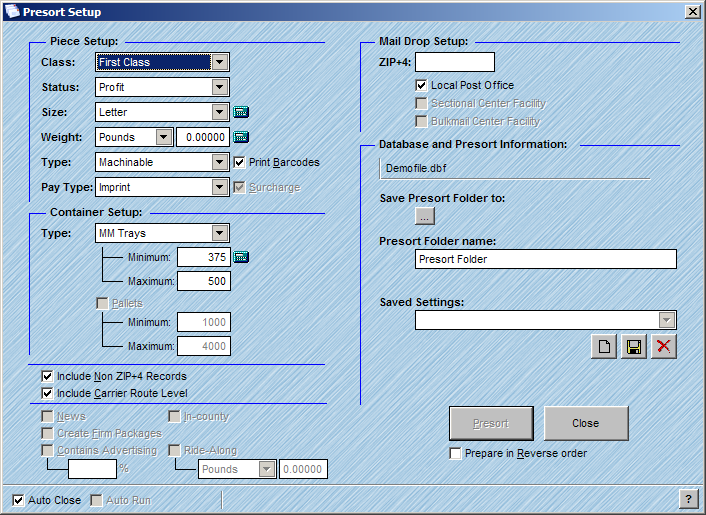
The Presort Setup window will appear.

Set up your Presort Parameters as described below:
Piece Setup
The Class pull-down
Class determines how your mail will be delivered. There are four options to choose from: First Class, Periodicals, Standard Mail, and Bound Printed Matter. Whichever class of mail you choose, you must hold a permit at your local post office for the selected class of mail. First Class Mail gets top priority. However, when Periodical and Standard Mail is prepared as automation compatible delivery point barcoded, the mail will be processed with the First Class Mail.
Whenever possible, you should choose to mail Standard Mail (A) automation instead of First Class automation. There are two main reasons:
* First Class and Standard Mail (A) automation compatible is processed at the same time.
* Standard Mail (A) can weigh up to 3.367 ounces before you are charged any pound rates, while First Class mail can only weigh up to one ounce. For everything over an ounce, you are charged additional postage.
|
TIP! |
Periodical Mail and Bound Printed Matter preparation requires additional setup to adhere to postal regulations. |
The Status pull-down
Status determines what type of organization that the company is that the mailing is being prepared for. For Standard Mail, there are two options to choose from: profit or non-profit. If the mailing is being prepared for a non-profit organization, you should have special permission from the post office to mail at these lower rates. For Periodical Mail, there are two other options, Classroom and Science of Agriculture. Both must be pre-approved by the post office before the mailing is submitted.
The Size pull-down
The size of your mail piece is determined by the length, width, and thickness. The class of mail you select will influence the choices you have when deciding on the size of your mail piece. The size of your mail piece is also determined by which way you apply the label or print the name and address on the mail piece. For example, a 6X9 envelope is considered a letter if the label is applied horizontally to the nine-inch width.
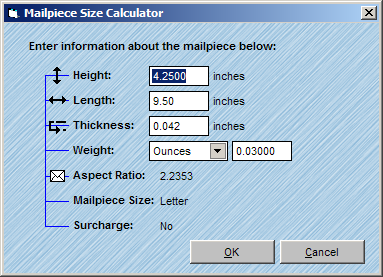
In AccuZIP6, you can determine if your mail piece is a letter, flat, or card by using the Size Calculator in the Presort Setup window.
Follow the steps below to calculate your mail piece size:
Click on the Size Calculator ![]() next to the Size pull-down.
next to the Size pull-down.
The Mail Piece Size Calculator will appear:

Enter the Height of the mail piece.
Enter the Length of the mail piece.
Enter the Thickness of the mail piece.
Click OK to update the Presort Setup window with the calculated size.
The program will determine the Size of the mail piece based on the information that you entered, and will update the Presort Setup window when you click OK. A check will be displayed next to the Size Calculator indicating that the Size Calculator was used to determine the size of the mail piece.
The Weight pull-down
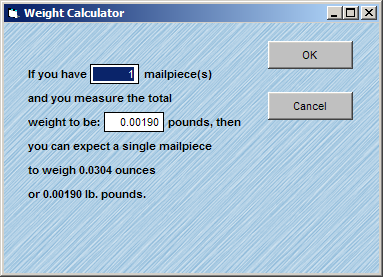
The weight of your mail piece can affect your postage rates. It is important that the weight of a single piece is accurate to avoid problems when submitting your mail to the USPS. If you do not know the weight of a single piece, you can use the Weight Calculator to assist you if you have a total weight of any number of pieces.
Follow the steps below to calculate the weight of a single piece:
Click on the Weight Calculator ![]() next to the Weight pull-down.
next to the Weight pull-down.
The Weight Calculator window will appear

Enter the total amount of pieces that you have weighed.
Enter the collective weight of the total pieces.
Click OK to update the Presort Setup window with the calculated weight.
The program will update the Presort Setup window when you click OK. A check will be displayed next to the Weight Calculator indicating that the Weight Calculator was used to determine the weight of a single piece.
The Type pull-down
There are three types of mail that can be processed through AccuZIP6: machinable, non-machinable, and manual. The type pull-down menu allows you to specify which type of mail you will be presorting. For a breakdown of each, see the notes below:
Machinable
Machinable mail is automation compatible mail with a barcode printed on the piece. Verify your particular mail piece's eligibility for automation rates with your local post office, or consult the Domestic Mail Manual, published by the United States Postal Service for details.
Non-Machinable
Mail pieces that are of the correct aspect ratio and thickness to be processed through automation equipment, yet will not have a barcode printed on the piece, will be classified as non-machinable. Selecting Non-Machinable from the Type pull-down will provide the applicable nonautomation postage rates, and print tags with the "MACH" identifier required by the USPS.
Manual
Manual pieces are pieces that exceed the limitations set forth by the USPS for machinable mail. Typically these pieces will be too thick, or the aspect ratio will be too small, or an equally problematic issue for automation equipment. Selecting manual will give you the same nonautomation rates as Non-Machinable (in most cases), but will also print "MAN" on the container tags, required by the USPS.
The Print Barcodes Checkbox
The Print Barcodes checkbox is the final determination within AccuZIP6 as to whether your mail will receive automation discounts or not. If you select Machinable in the Type pull-down, then you can enable the Print Barcodes option. If Non-machinable or manual is selected in the Type pull-down, then the checkbox will be dimmed.
Pay Type pull-down
The Pay Type pull-down allows you to select your payment method for the mailing. The available options are Imprint, Meter, or Stamps. AccuZIP6 automatically checks the appropriate payment box on the mailing statement that corresponds to your selection in the Pay Type pull-down menu.
Container Setup
The Type pull-down
The Type pull-down allows you to specify the tray size that you'll be using. The options are extensive in AccuZIP6 5.0, allowing you to choose from the following:
MM Trays
EMM Trays
Flat Trays
Sacks (White)
1' MM Trays Only
2' MM Trays Only
EMM Trays are two-foot letter trays that measure 21 3/4 inches long by 11 1/2 inches wide (inside bottom dimensions) by 6 1/8 inches high. These trays must be used for letter-size mail that does not fit in regular MM trays. Select the EMM Trays Only item if your mail piece size requires their use. If you used the Size Calculator, the program will automatically select EMM Trays if your mail piece size is calculated to require use of this type of tray. Refer to the applicable section of the Domestic Mail Manual for detailed container requirements for your class of mail.
The Container Minimum and Maximum
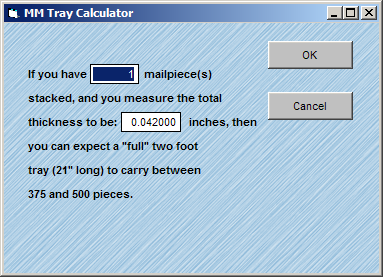
Use the Tray Calculator ![]() to calculate your tray minimum and maximum per postal regulations. The minimums and maximums vary dependent upon the size of your mail piece and the postal regulations for each class of mail. The Tray Calculator takes into consideration all of these factors, and will automatically update the Presort Setup window based on the information that you enter. You may also enter the Tray minimum and maximum manually. Standard and Periodical class flat size mail minimums and maximums (as well as container type) will be calculated automatically based on the weight of the mail piece per postal regulations. You may adjust the numbers manually, but caution must be exercised as to not adhere to the postal regulations for your class of mail.
to calculate your tray minimum and maximum per postal regulations. The minimums and maximums vary dependent upon the size of your mail piece and the postal regulations for each class of mail. The Tray Calculator takes into consideration all of these factors, and will automatically update the Presort Setup window based on the information that you enter. You may also enter the Tray minimum and maximum manually. Standard and Periodical class flat size mail minimums and maximums (as well as container type) will be calculated automatically based on the weight of the mail piece per postal regulations. You may adjust the numbers manually, but caution must be exercised as to not adhere to the postal regulations for your class of mail.
Follow the steps below to use the Tray Calculator:
Click on the Tray Calculator in the Presort Setup window.
The Tray Calculator will appear:

Enter the total amount of pieces that you have measured, and the measurement in inches. The Tray Calculator will display the recommended tray minimum and maximum per the thickness.
Click OK to update the Presort Setup window with the calculated tray minimum and maximum.
The program will then update the Presort Setup window. A check will be displayed next to the Tray Calculator indicating that the Tray Calculator was used to determine the minimum and maximum pieces per tray.
The Include Non ZIP+4 Records check box
Check the Include Non ZIP+4 Records check box when you want to include records that do not have a ZIP+4 or barcode assigned to them. When this box is checked, any records that have a valid 5-digit ZIP code, but do not have a +4 assigned to them, will be presorted for nonautomation and will be included in the non-automation portion of the mailing statement (when applicable).
The Include Carrier Route Level check box
Check the Include Carrier Route Level check box when you want to sort the mail to the Carrier Route level. When this box is checked, you will receive the lowest possible postage rates per postal regulations. In some cases, this may create more containers than a non-carrier route based mailing.
The Mail Drop Setup
In the 5-Digit ZIP code text box type the 5-digit ZIP code for your local post office or the 5-digit ZIP code where your mailing permit is held. If you are unsure, contact the post office where you normally submit your mail and ask them for their ZIP code. As you type in the ZIP code into the text box, AccuZIP6 will display your local post office name, SCF (Sectional Center Facility), and BMC (Bulk Mail Center). Check the box or boxes where you plan to drop the mail. The advantage of drop shipping mail at the BMC or SCF is lower postage rates and faster delivery of mail. Only some of the mail may qualify to be dropped at the SCF or BMC. AccuZIP6 will determine the discounts, as the mail is presorted when the additional check boxes are checked. The only drawback for qualifying for these lower rates is that you are required to drive the mail to the facilities and drop off the qualifying pieces of mail. You must also obtain special permission from your local post office to do this. Most of the time, you will be able to pay for all of the mail at your local post office, then, drop the mail at the SCF and/or the BMC post offices. These other post offices could be many miles away from your location, and not worth the savings in postage. You must decide if it is worth it for you.
DDU Setup and Drop Shipping
If you receive carrier route rates in your mailing, you may qualify for additional, Destination Delivery Unit (DDU) discounts on the carrier route qualified mail. Pieces that are being entered at the delivery unit that serves the delivery address on the mail could qualify for DDU discounts. You can enter and save as many sets of zips for different DDU’s as desired and choose them when you plan to drop at a given post office.
The Database and Presort Information – Save Presort to setup
When AccuZIP6 presorts the mail, a presort folder is created to store the presort print files created during presort. This will allow you to open existing presorts rather than presorting again when you need to print. By default, AccuZIP6 will save the Presort Folder to the directory the database you are sorting is stored in, and name the folder "Presort Folder". You can determine the name of this folder and where you would like this folder to be stored by following the steps below:
Click on the Browse button to choose the location where you want the presort folder to be created.
Type the desired name for the folder into the provided text box.
Check the Overwrite check box to overwrite the existing presort folders.
The Overwrite check box will only appear when a folder already exists with the same name in the directory that you have selected.
The Saved Settings feature
You can save the settings that you have defined in the Presort Setup window for each type of mailing that you do. If you do many different jobs for different people with different settings, this will be extremely useful to you. Once you have defined the settings for a job, follow the steps below to save the settings:
Click on the New button ![]() .
.
Type a Setting Name into the provided text box. The name should be something to do with the job that you are performing. There is no limit to the amount of characters in this text box.
Click the Save Current Settings button.
The next time you want to use the Saved Settings, simply choose it from the Saved Settings pull-down.
To delete and existing Setting Name, click the Delete Settings Name button .
The Prepare in Reverse Order check box
Most Direct Imprint printers stack the mail from bottom to top as they release the material. This causes cumbersome collation during the tray loading process. The Prepare in Reverse Order check box will correct this problem by sorting the mail from the back of the tray to the front allowing the pieces to simply be picked up and placed in the tray.
Once you have defined all of the settings in the Presort Setup window, click Presort.
When the presort process is completed you will be ready to print the reports, tags and labels to take to the post office.