This tutorial will give you an excellent foundation for working with AccuZIP6 5.0 by showing you how simple and easy AccuZIP6 is to use for most mailing and database management functions. AccuZIP6 5.0 has so many useful functions that it is impossible to absorb them all within this tutorial, however. Thus, we will be covering the core procedures within the software to prepare a demonstration list for mailing from start to finish. For more advanced features and data manipulation, refer to the appropriate topic within this Help System. The procedures that are covered within this tutorial include:
Opening a Comma-Delimited Text File
Optimizing the Database
Validating Records (CASS Certifying records)
Duplicate Detection
Presorting the Mail (PAVE Certification)
Printing the Barcoded Tray/Sack Tags, Reports, and Postal Service-required Mailing Statements.
Printing the Mailing Pieces or Labels.
The first step is to open the AccuZIP6 5.0 program. AccuZIP6 5.0 launches the same way that most other Windows-based programs do on your computer; from the Windows Start button, select Programs>AccuZIP6 5.0>AccuZIP6 5.0. The program will open and you will be at the appropriate screen to begin this tutorial. You may want to print this page to refer to as you work with the software for the first time.
Opening a Delimited Text File
Delimited text simply means that a file (normally an ASCII text file) has the same character or characters that separate one field from another. The two most common Delimited Text files are Tab and Comma-Separated text, where either a tab or a comma separates the fields. Most programs available on the market today have the ability to create a file in one (or both) of these formats. The feature most associated with creating this type of file in programs is called Export or Save As. When a file of this type is created, the file name normally ends with .txt or .csv.
For your first procedure in AccuZIP6 5.0, you will learn what each of the different choices available to you in the Open/Create screen mean, and open our demonstration comma-delimited data file.
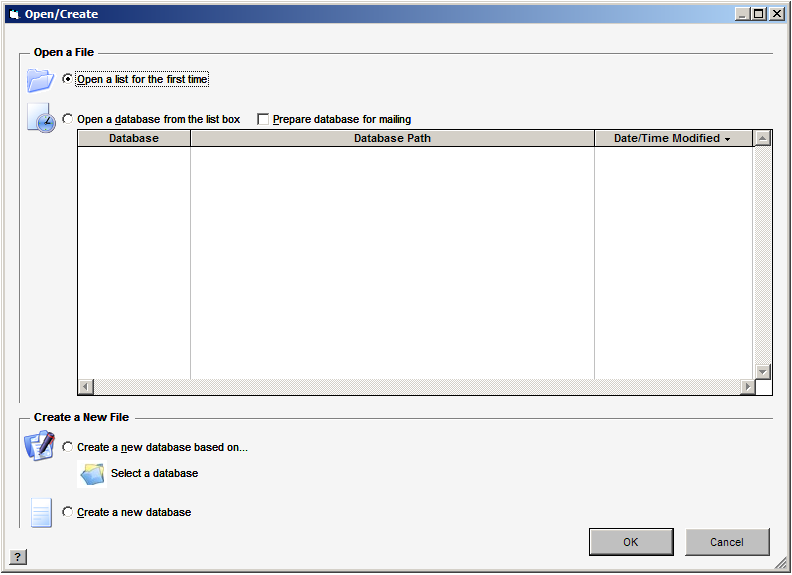
When you open AccuZIP6 5.0, the first screen you see is the Open/Create screen, shown below:

There are four basic options in this window, and each is described in detail under the Open/Create topic. For the purposes of this tutorial, we will be using the first option, Open a list for the first time.
Follow each step below to import a list for the first time:
In the Open/Create window, select the Open a list for the first time radio button and click OK. The Open Setup window will appear:

Click on the button under Select the Input File. This is where you will select which data file you'll be importing into AccuZIP6. An Open dialog box will appear:
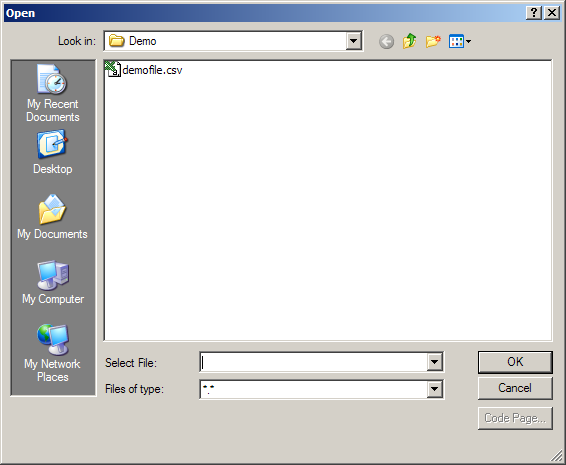
Browse to the Demo folder (C:\Program Files\AccuZIP6 5.0\Demo by default) and select the file named "demofile.csv". Click OK.
The file name and path will appear in the Open Setup screen, and the program will note that the file has been determined to be a Comma-Separated Text file. You can save the new database to another location on your computer in step 2, Save the New Output File to this Location. For the purposes of this tutorial, we'll leave the path set to default, which will create the new AccuZIP database in the same folder as the input file. We're now ready for the next step in the importing process, field mapping.
TIP! |
AccuZIP databases save to the same location as the input file by default. To change the default save behavior, modify the Save Databases parameter in the Folders tab of the Properties screen (File>Properties). You can set the default path to be your "C:\Mailings" folder, or any path of your choosing using this method. |
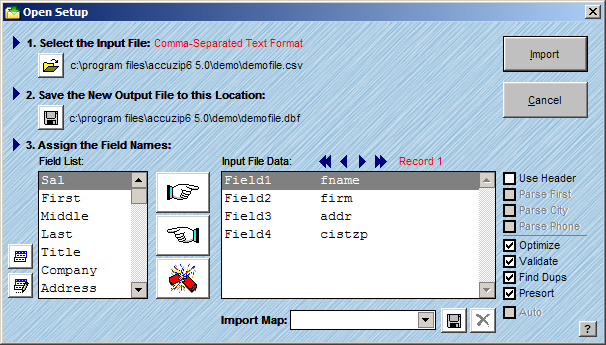
Once the Input File has been assigned, and the Output File location has been specified, you must assign the AccuZIP6 field names to your data. This is called mapping the fields. The Field List (the default field names that AccuZIP6 recognizes and uses) will be displayed on the left hand side of the Open Setup window, while the two columns in the Input File Data section display your input file's contents.
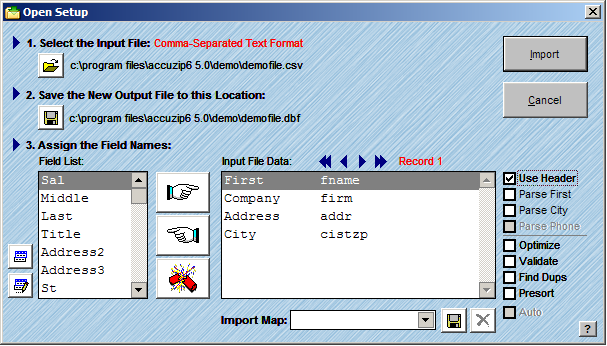
The file that we are opening contains a Header Record. In this case, manual field mapping is not necessary, because the field names appear in the first record in the file. This is called a Header Record. When you have a Header Record in your file that matches the Auto Field Maps table, you can simply check the Use Header check box and the field names in the first record are used, as shown below:
In the Open Setup window, you can select options to automatically proceed with specific functions of a mailing (the core options of optimizing, validating, finding duplicates, and presorting). For the purposes of this tutorial, we will perform these steps manually, however. Let's continue!
Check the following boxes and review the explanation of each:
Use Header - Check this box to use an existing Header Record (typically the first record in an Input File) as field names in the AccuZIP6 Database. This refers to the Auto Field Maps table to determine recognized header record field names. Unrecognized names will not be used for default AccuZIP6 functions.
TIP! |
AccuZIP6 uses a table found in the Properties window (File>Properties>Fields) called the Auto Field Maps table to determine what fields are recognized by the software. If your header record contains a recognized field name, then the corresponding AccuZIP6 field will be automatically assigned when checking the Use Header box. This is important! If your header record uses an unconventional name (mail_add1, for example), then AccuZIP6 will not recognize the field, instead calling it "mail_add1" and ignoring it. Since AccuZIP6 requires the address to be in the field called "address", and your field map did not include address, AccuZIP6 creates the address field and uses it by default. The software then validates this address field, not your original mail_add1. This is when the Auto Field Maps window becomes very useful. For this example, you'd select the address field, and enter a new association for that field (mail_add1).
|
Parse First - If the field named First is mapped to the full name data in the Input File Data, the Parse First check box will be enabled. When this box is checked, the full name data will be separated into the fields Sal, First, Middle, Last, and Title when the list is imported.
Parse City - The Parse City checkbox will be enabled if the field name City is mapped to a single field that contains the City, State, and ZIP Code. If you check the Parse City check box, AccuZIP6 will automatically create the fields ST and ZIP to accomodate this information when the field is parsed.
Leave all other check boxes unchecked, as this tutorial will walk you through performing the core functions within AccuZIP6 manually.
Click Import - The fields First and City will be Parsed, and the import process will be complete. You will then see the List View in AccuZIP6 displayed on screen.
Optimizing the Database:
From the List View, the first step you'll want to perform after Importing is to Optimize the Database. Performing an optimization greatly enhances the speed of processing within the AccuZIP6 environment. To Optimize, first click Special>Optimize Database to bring up the Optimize Database window. With AccuZIP6, you can determine the extent of optimization with the check boxes shown:

Leave the default boxes checked and click Optimize.
As soon as the Optimization process is complete, close the window (if Auto Close is not selected, in which case it will close on its own).
Validating Records
The next few steps will describe how to validate, or CASS certify, records. This process adds the +4 to your ZIP code, the Carrier Route, and Delivery Point Barcodes to all of your records that are determined to have a matching range within the USPS Database. Validating is required if you want to presort for automation rates. The Validate Records window offers many features to control the output and integrity of your data after CASS certification.
From the Special menu, click Validate Records. The Validate Records window will appear:

Check the boxes as shown in the above diagram (the bottom five selections in the output column are selected by default; Line of Travel is a useful feature that you'll want to keep selected for most standard validations as well. It's required for most carrier route rates, and it doesn't slow down the validation process at all. For a more thorough description of the options in the Validate Records window, refer to the Validating the Data section of the help guide.
Click on the Validate button, and the Validating Records Results window will appear. This window shows a detailed breakdown of the deliverable/non-deliverable records, as well as statistics for the time it took to process the list, the speed of processing, and specific pieces of data added to the records:
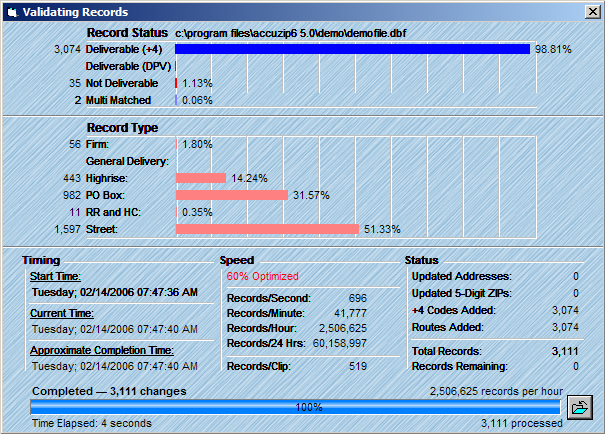
As soon as the validation process is completed, this window will close and you'll be returned to the List View. We will next perform a basic duplicate detection on the demofile.
From the Select menu, choose Show Duplicates. The Show Duplicates window will appear:
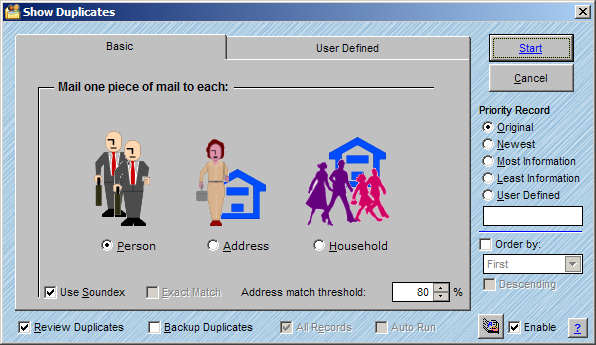
The AccuZIP6 Show Duplicates window offers two methods of duplicate detection, shown by the tabs at the top of the screen: Basic and User Defined. The Basic duplicate detection process finds duplicates by matching specific predefined fields in the database. The User Defined duplicate detection method allows you to control the fields (or portions of a field) that you wish to match on. For the purposes of this tutorial, we will be using the Basic method of detection.
Click on the Basic tab if it's not already selected.
Select "Person" as your chosen match code.
Set the Priority Record to "Original". This tells AccuZIP6 which record you want to keep when finding duplicates. Original flags the record closest to the top of the list as the priority record, while Newest would keep the record closest to the bottom.
Enable the A.K.A. Dictionary in the lower right-hand corner of the window. The A.K.A. Dictionary includes common match code references that aid in duplicate detection. For example, Bob would be flagged as a match for Robert; Mike for Michael, etc. For more information on the A.K.A. Dictionary, see the A.K.A. Dictionary section of the help guide.
Select the "Use Soundex" option. This uses a unique algorithm to compare names that sound similar. For example, Carrie and Kari.
Leave the address match threshold at 80%. This adjusts the percentage of characters in the Address field that the program will use to detect duplicates by searching the field from left to right. This percentage is of the entire field, not just the data within it!
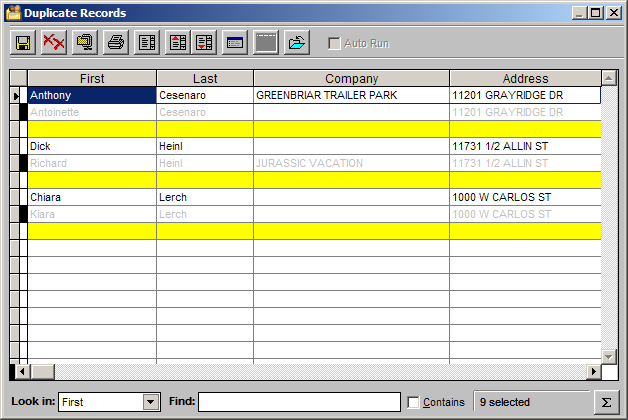
Ensure that "Review Duplicates" is selected. This will present you with a window showing all matches after running the detection, allowing you to manually make changes if desired.
Click Start. The duplicate detection engine will then query the data and present you with the Review Duplicates window:
Click
the Print button ![]() to print
the Duplicate Records Report. The Print Options Dialog box will
appear:
to print
the Duplicate Records Report. The Print Options Dialog box will
appear:
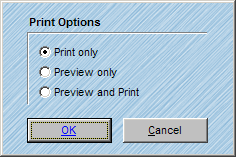
Select the option you would like to use to generate the Duplicate Records Report. AccuZIP6 will return to the Review Duplicates window when finished printing the report.
Once
returned to the Review Duplicates window, click the Update Database
button ![]() . This updates
the main database with the detected duplicates. When you click
this button, a dialog box will display the count of duplicates that
have been flagged for deletion. Click the OK button, and you
will be returned to the main database. Duplicates flagged for
deletion are only temporarily deleted (shown as a greyed out record
in the List View), but can be permanently removed by selecting Edit>Pack
Database.
. This updates
the main database with the detected duplicates. When you click
this button, a dialog box will display the count of duplicates that
have been flagged for deletion. Click the OK button, and you
will be returned to the main database. Duplicates flagged for
deletion are only temporarily deleted (shown as a greyed out record
in the List View), but can be permanently removed by selecting Edit>Pack
Database.
TIP! |
The basic duplicate detection options all share a few fields in common: address, city, st, and zip. Every basic detection option queries those fields. The differences in the three types of basic duplicate detection are as follows:
Person - Queries the First and Last fields as well as Address, City, St, and ZIP Address - Queries the Company field as well as Address, City, St, and ZIP Household - Queries the Last field as well as Address, City, St, and ZIP
|
Congratulations! You're now ready to presort the mail!
Presorting the Mail
The next few steps will describe how to Presort the Mail. Presorting groups all records together by ZIP code, distributes the ZIP code groups to carrier route, 5-digit, 3-digit, scheme, ADC/AADC, and MADC/MAAD trays and sacks, depending on the quantities per 5-digit ZIP code and the class of mail you are sorting for. Presorting also produces the proper destination tags so that your mail goes to the correct post office facilities, which can then process the mail for the particular ZIP codes more efficiently.
When a list is presorted properly, the post office rewards you with lower postage rates. The finer mail is sorted, the lower your rate. The most efficient way to prepare your mail is for automation discounts. Information on making your mail piece automation compatible can be found at your local post office, or online at http://pe.usps.gov. AccuZIP6 is PAVE (Presort Accuracy Validation Evaluation) Certified for all types of presorts.
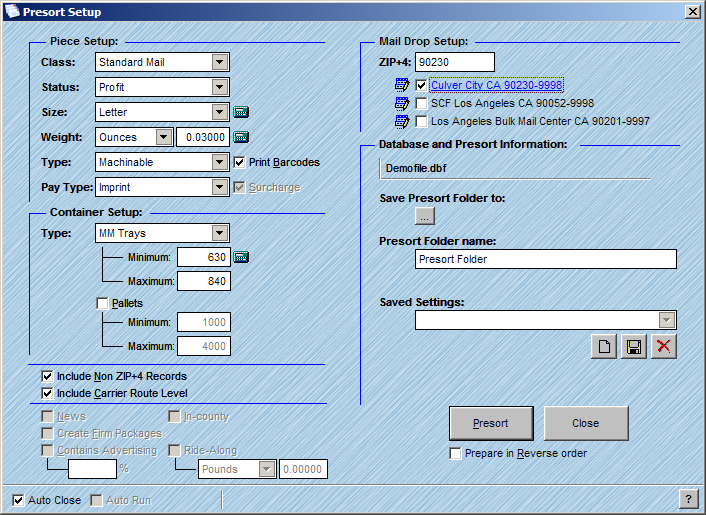
From the Sort menu, choose Presort Mail. The Presort Setup screen will appear:
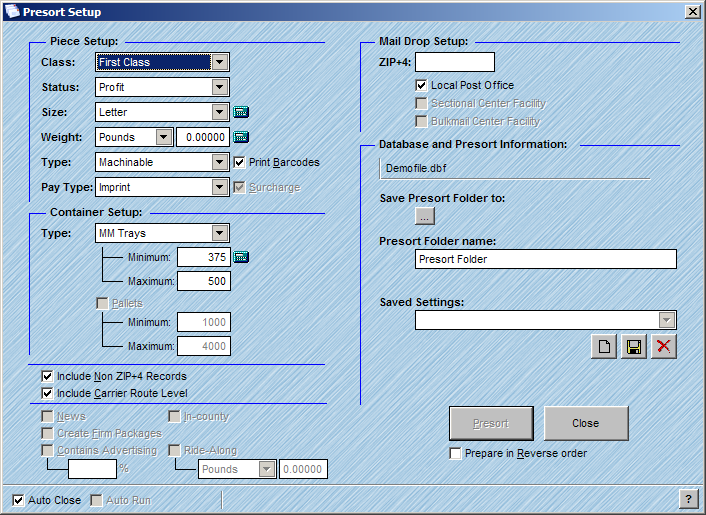
For the purposes of this tutorial, we will be preparing a Standard Class, Letter-sized piece for mailing. Follow the steps below to set up the presort properly:
From the Class pull-down, select "Standard Mail".
From the Status pull-down, select "Profit".
From the Size pull-down, select "Letter".
From the weight pull-down, choose "Ounces", and type ".03" (without the quotation marks) into the text box.
From the Type pull-down, choose "Machinable". Enable the "Print Barcodes" option.
From the Pay Type pull-down, choose "Imprint".
TIP! |
Not sure what your mail piece's size should be? That's ok! Use the size calculator button to open the Mailpiece Size Calculator window! You can then enter the height, length, and thickness of the piece, and AccuZIP6 will determine the proper size choice to select for you! You can use the other calculator buttons in the presort setup screen to determine the weight of a single piece and the minimum and maximum pieces per tray as well. If you're not sure what the required data of your particular sort is, click on the appropriate calculator button and let AccuZIP6 determine the correct settings for you!
|
You've now determined your basic piece and sortation settings, and you're ready to set the minimum and maximum pieces per container. This is an extremely important step, as United States Postal Service regulations have specific guidelines for what constitutes a "full" tray or sack. You'll want to follow the next few steps to ensure that the containers won't fail inspection at the post office:
Click
the Size Calculator ![]() next
to the Container Minimum in the Container Setup portion of the Presort
Setup window. This will bring you to the MM Tray Calculator
window:
next
to the Container Minimum in the Container Setup portion of the Presort
Setup window. This will bring you to the MM Tray Calculator
window:
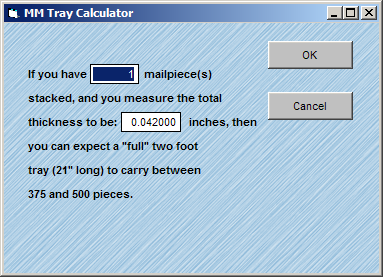
The simplest way to explain the calculations is to grab a stack of your mailing pieces that measures approximately one inch high. Count the number of pieces in that stack, and then entire the data in the text boxes. In this particular example, we'll say that you count forty pieces in the one-inch stack.
Enter 40 in the mailpieces text box, and 1 in the inches box as shown:
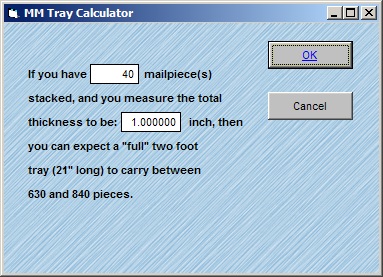
After doing so, AccuZIP6 has determined that you can expect a full tray to carry between 630 (minimum) and 840 (maximum) pieces. Note that the minimum number of pieces for trays will always be 85% of the maximum value.
Click OK, and you will be returned to the Print Presort Screen, which should look like the following:
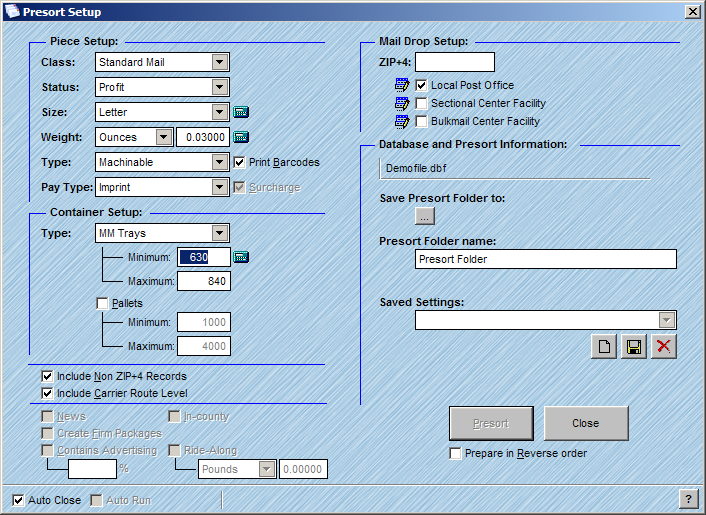
Ensure that the Include Non ZIP+4 Records and Include Carrier Route Sort Level checkboxes are enabled.
The next step is to input the data for your Mail Drop Setup. The ZIP+4 is the location where your permit is held. For the purposes of this tutorial, we'll use Culver City, CA.
In the ZIP+4 text box under Mail Drop Setup, input "90230" and hit Tab on your keyboard. This will set your local post office to Culver City, CA 90230-9998.
Under
the Saved Settings pulldown, Click the Create New Settings button
![]() , then type "Demofile"
into the Saved Settings box. Lastly, click the Save Current
Settings button
, then type "Demofile"
into the Saved Settings box. Lastly, click the Save Current
Settings button ![]() . This
allows you to recall any saved presort settings at any time from the
drop-down menu.
. This
allows you to recall any saved presort settings at any time from the
drop-down menu.
When completed, your presort set screen should like the following:
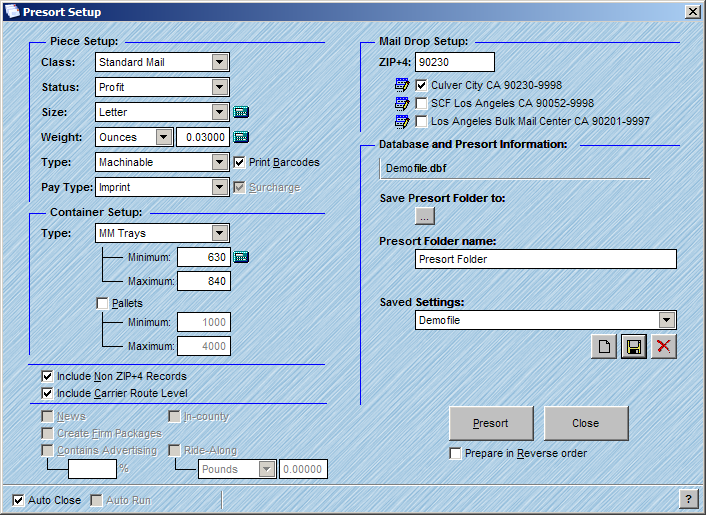
Click Presort, and you'll be taken to the Print Presort window:
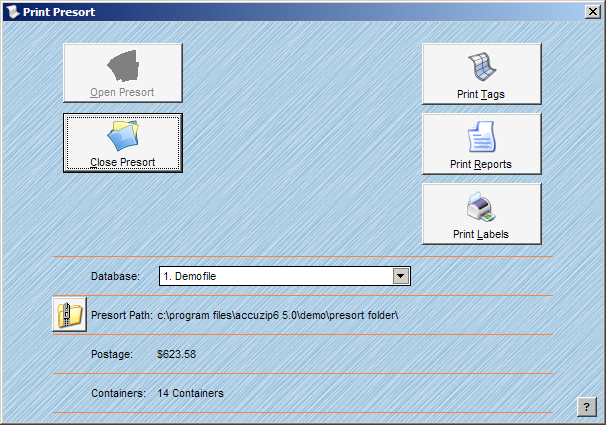
At this point, you're ready to begin printing the applicable documentation and labels!
The first thing you'll typically do after presorting is to print the postal paperwork and ensure that the sortation and numbers match up. To do so, click on the Print Reports button. You'll be taken to the Report Settings window:
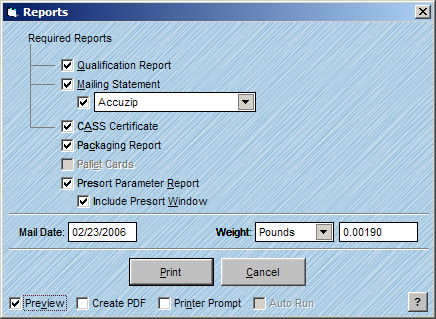
Check all the report options, and then check the preview box. This will then bring up the previews of each report, in order.
Next up will be the tags for the containers that you'll be placing your mail into.
Click the Cancel button on the Reports window, which will return you to the print settings screen. Click on Tags. The next window to appear will be the Tags window:

When printing tags, you will be allowed to print a tag summary report (not required by the Post Office, but helpful in determining where your mail is sorting to with a quick summary report) as well as print the tags themselves. For the purposes of this tutorial, you'll be printing tray tags for standard mail automation letters.
Select Cut Sheet from the source, and Trays as the container type. Check the preview box and then hit print. You'll then be presented with previews of the Tag Summary Report, as well as the tags themselves.
The final step in the preparation of any mailing is in the printing of the mailing pieces themselves. There are far too many options to cover in the tutorial with regards to individual label or envelope sizes, content, or design, so most of the instructions have been divided up into multiple sections on editing labels. For this tutorial, we'll just preview a sheet of Avery 4145 labels on a standard Laser printer.
Cancel the Container Tags window, and click the Labels button on the Print Presort window. The print settings window will appear:
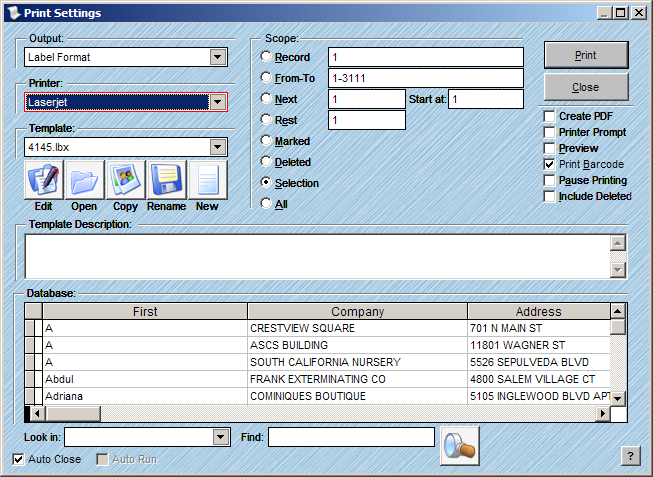
In the Printer pull-down menu, select Laserjet. This determines the barcode type that AccuZIP6 will be sending to your printer. For a standard Laserjet, AccuZIP6 sends a standard True Type font image for the barcode.
In the Template pull-down menu, select 4145.lbx. This is a standard one-column Avery label equivalent.
Check the Preview and Print Barcode checkboxes, and click Print. You will then be presented with the final preview of the tutorial: the labels themselves.
After performing the functions found throughout this tutorial, you'll have a firm grasp of the fundamental operations within AccuZIP6. The core features (importing, optimizing, validating, detecting duplicates, and presorting) are just a fraction of what AccuZIP6 5.0 is capable of, but are more than likely the operations you'll return to time and again with each successive mailing.
For more detailed instruction on other operations within AccuZIP6, refer to the applicable section of the help guide.