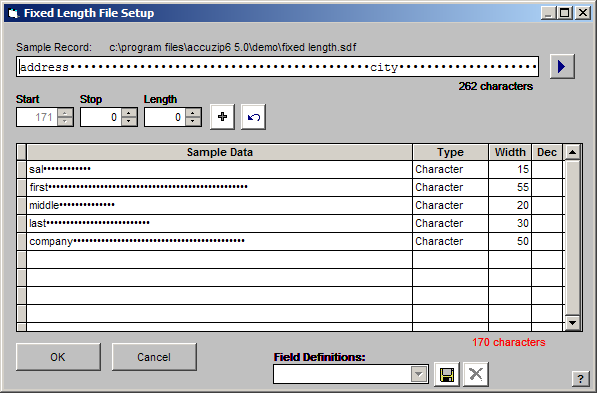
AccuZIP6 now has one of the best Fixed Length Text file importing features available on the market today, allowing you to easily define the field lengths. After the format is determined, you can actually save the structure. Then, the next time you have a file with the same format, you can simply choose the predefined Field Definitions.
From the File menu choose Open List.
Click the Open Folder button . An Open dialog box will appear.
In the Open dialog box, browse your hard disk and locate the desired file. Select the file and click OK. The Fixed Length File Setup window will appear.

|
TIP! |
Put your mouse over the edge or corner of the window and click and drag to expand the window for a better view. |
Your objective is to determine the field widths in the Fixed Length File Setup window. Your file data will be displayed in the Sample Record along with the name and location of the Fixed Length text file. There are four different techniques for you to choose from when defining a Fixed Length Text file structure. Each technique is described in detail below:
Technique #1 - Left Click and Plus:
Click the cursor at the end of the first field and click the plus button ![]() .
.
Notice that the data from the fist field moved to the Sample Data area and AccuZIP6 filled in the field Type and Length. Also notice the cursor in the Sample Record is now located at the beginning of the second field.
Repeat the above steps until all of the fields are defined in the Sample Data.
Click OK. The Input File Data will be displayed in the Open Setup window.
See Opening a New List for further instructions.
Technique #2 - Right Click:
Left-click with your mouse at the end of the first field and then right-click to select the field break.
Notice that the data from the fist field moved to the Sample Data area and AccuZIP6 filled in the field Type and Length. Also notice the cursor in the Sample Record is now located at the beginning of the second field.
Continue to left and right-click at the end of each field until all fields are listed correctly under Sample Data.
Click OK. The Input File Data will be displayed in the Open Setup window.
See Opening a New List for further instructions.
Technique #3 - Type in the Field Lengths:
Click the cursor into the Length box and type in the Length of the first field.
Click the Plus button ![]() .
.
Notice that the data from the fist field is displayed in the Sample Data and AccuZIP6 filled in the field Type and Length. Also notice that the cursor is located at the beginning of the second field in the Sample Record.
Type in the Length of each field and click the Plus button after each entry until all the fields are listed correctly under Sample Data.
Click OK. The Input File Data will be displayed in the Open Setup window.
See for Opening a New List for further instructions.
Technique #4 - Type in Field stopping points:
Click into the Stop box and type in the amount of characters contained in the first field.
Click the Plus button ![]() .
.
Notice that the data from the fist field moved to the Sample Data area and AccuZIP6 filled in the field Type and Length. Also notice that the cursor is located at the beginning of the second field in the Sample Record and the Start data is one number higher than the Stop position of the last field.
Type in the Stop position for each field and click the Plus button after each entry until all fields are listed correctly under Sample Data.
Click OK. The Input File Data will be displayed in the Open Setup window.
See Opening a New List for further instructions.
|
TIP! |
You can use the Undo button to go back to the previous field in the Fixed Length Setup window. You can also click the Next Record button to move to the next record in your list to help determine the field Lengths. |
Saving the Fixed Length Structure:
You can save the Fixed Length Structure to use when you import Fixed Length Text files with the exact same structure. We recommend that you use this feature to save yourself time with future imports.
After you have setup your Fixed Length File Structure, Click the Disk button at the bottom of the Fixed Length Setup window. A Save As dialog box will appear. In the Save As dialog box, the file name will appear under Save Map As. The file name will have an .fmp extension. By default, the map will save using the file name that you are importing. However, if you would like to use a different name for your map, highlight the file name and change it. Do not browse to a new location - the Field Maps folder will be selected automatically.
Press Save.
The next time you import a file with the same format, select the Structure from Field Definitions.
|
TIP! |
You can use the Undo button to go back to the previous field in the Fixed Length Setup window. You can also click the Next Record button to move to the next record in your list to help determine the field Lengths. |