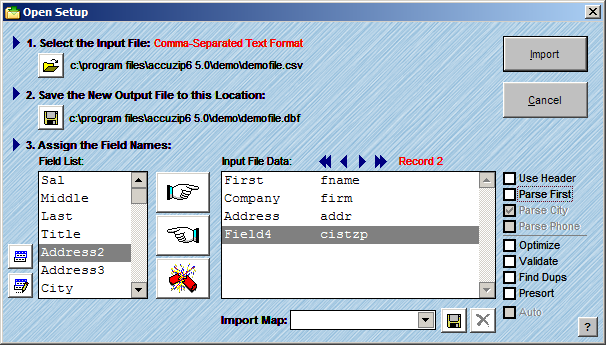
Once the Input File has been opened, and the Output File location has been specified, you must assign the field names to your data. This is called mapping. The Field List will be displayed on the left side of the window and your data will be displayed under Input File Data on the right side of the window. The objective is to assign field names from the Field List on the left to the Input File Data on the right.

Assigning the Field Names:
Mapping the fields can be done easily using the buttons within the Open Setup window. First, select the field name to be assigned to the data from the Field List, then use the buttons as described below:
![]() Maps the highlighted field names from the Field List to the highlighted Input File Data.
Maps the highlighted field names from the Field List to the highlighted Input File Data.
![]() Removes the field name from the selected Input File Data.
Removes the field name from the selected Input File Data.
![]() Resets all the field names in the Input File Data.
Resets all the field names in the Input File Data.
|
TIP! |
You can also assign field names to the selected Input File Data by simply double clicking on the field name in the Field List! |
AccuZIP6 is designed to automate processes wherever possible. In the Open Setup window, there are some great features described below that will simplify the mapping process.
Automatic Field Mapping:
AccuZIP6 has a built in automated mapping feature that contains a cross reference for commonly used field names in Header Records (typically the first record in an input file). You can add your own commonly used field names to the cross reference to make field mapping easier in the future. See Automatic Field Mapping for more information.
Editing the Field List:
Additional field names can be added to the Field List if you do not see an appropriate match in the existing Field List by following the instructions below:
Click the Edit Field List button ![]() . The Table Designer will open.
. The Table Designer will open.
Click the mouse in the table at the point where you want to add the field.
Click Insert. A new field will appear and will be highlighted.
Type the desired field name and adjust the field type and length as desired.
Click OK.
Click Yes to make the structure changes permanent.
For more information on the Table Designer, see Editing the Table Design.
Saving the Mapping Sequence:
After the field mapping is complete, you can save the mapping sequence for other files that have the exact same format by following these steps:
Click the Save button ![]() that appears next to the Import Map at the bottom of the Open Setup window. In the Save As dialog box, the file name will appear under Save Map As. The file name will have a .imp extension. By default, the map will save using the file name that you are importing. However, if you would like to use a different name for your map, highlight the file name and change it. Do not browse to a new location - the Import Maps folder will be selected automatically, and only import maps saved in the Import Maps folder will be displayed in the pull-down menu.
that appears next to the Import Map at the bottom of the Open Setup window. In the Save As dialog box, the file name will appear under Save Map As. The file name will have a .imp extension. By default, the map will save using the file name that you are importing. However, if you would like to use a different name for your map, highlight the file name and change it. Do not browse to a new location - the Import Maps folder will be selected automatically, and only import maps saved in the Import Maps folder will be displayed in the pull-down menu.
Click Save. Notice that your Import Map has been saved so that you can select it in the future from the Import Map pop-up.
To delete the Import Map, click the Delete button ![]() .
.
|
TIP! |
For information on the check boxes in the Open Setup window, see Import Options.
|