Remove a Job from PostalOne to Re-Presort
The instructions in this tech note will teach you how to use the Re-presort feature of AccuZIP6 while retaining the intelligent mail barcode data serial numbers that have already been printed.
This is especially helpful when you presort and print a mailing you intend to drop before a USPS rate change date, only for plans to change, and now you have to drop the mailing after the new rates go into effect.
How to delete a job that has already been uploaded to the PostalOne Dashboard
If you have already uploaded your paperwork electronically, that paperwork will need to be removed from the dashboard. These instructions will show you how.
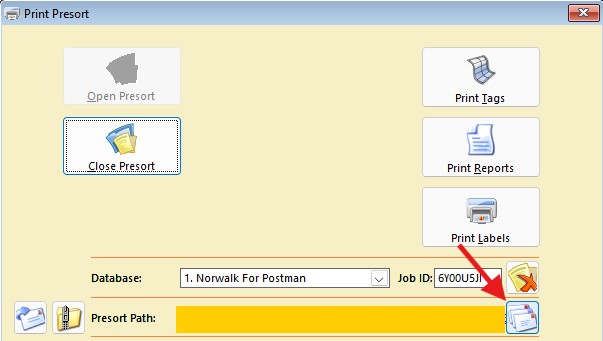
- In AccuZIP6, pull down the File menu and choose Print Presort.
- In the Print Presort screen, If your presort isn't open, click on the Database pull-down menu and select the database you presorted. This should open the correct presort. If it doesn't, click on Close Presort, click Open Presort, locate the correct presort folder, and open the presort.rte.
- With the correct presort open, click on the button with the red X, to the right of the Job ID box.

Clicking this button creates two .zip files inside of your presort folder: cancel_job_xxxxxxxx.zip and delete_job_xxxxxxxx.zip, and each displays a window similar to the one shown below:

- Launch the PostalOne application that you use to upload your paperwork electronically.
- Click the Job Validate/Upload button, then browse to your presort folder.
- Upload the Cancel file.
- After it says Upload Successful, upload the Delete file.
Now the mailing has been removed from your dashboard.
How to re-presort without generating new Intelligent Mail Barcodes
A mailing that used current postage rates but is dropping after a USPS rate change takes effect will need to be presorted again before uploading paperwork to the USPS. Follow these instructions to use the re-presort feature inside the Print Presort window.
In the Print Presort window, open your presort.
Click on the re-presort icon (pictured below).
Clicking on the re-presort icon will prompt this notice:

Click Yes.
This will take you to the Presort Setup window.
Add the word re-presort to the presort folder name to make it easy to differentiate this re-presort from the original.
Choose the date in which you'll be dropping your mail.
Click Presort.
In the Print Presort window, click Print Tags and re-print the container tags.
Click Print Reports and re-print the mailing statement.
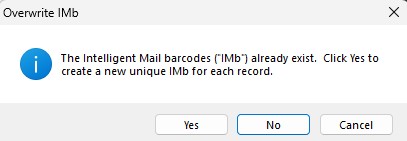
Click Print Labels. Choose Disk File from the Output pull-down menu, then click Continue.
At the Overwrite IMb prompt, click No. If you don't click anything, the Overwrite IMb window will close automatically and default to No.
Close the Export Setup window. There's no need to export again since the job has already been printed.
Now you're ready to upload your paperwork electronically through the PostalOne application, and this will reflect the new postage rates. When uploading your paperwork with the PostalOne application, browse to the re-presort folder instead of the original presort.